Here it is! The much-loved, long-awaited details post. When I was a planning bee, details posts were some of my favorites for the glimpse they gave into the wedding and personality of the bride and groom. As brides, we especially appreciate the thought and hard work that goes into the many details so it's only appropriate to share the finished product of months of planning.
Let's begin at the beginning. If you were a PaC wedding guest, you'd walk through the old mansion's heavy wood doors into the two-story grand hall, where your introduction to the wedding would have been our 16 foot welcome table filled with our escort cards, welcome banner, guestbook, and family photos.

The welcome table almost ready for prime-time!

A closer look at our "Better Together" bunting held aloft by twin apothecary jars filled with wine corks.

(guest photo)

The washi tape escort cards were a fun and simple DIY project. My favorite pattern was the overlapping bands. The translucency and diagonal striping meant no escort card was the same. As many of you pointed out, it's imprecise nature made it a breeze to create. Go with the easier option when you can. No one at the wedding knew I tried four variations. And it looked perfect to them!

"Why do all your friends' names end in 'ski'?" - Mr. PaC's mom
Mr. PaC's mom has beautiful and distinctive handwriting so we always knew she'd be our calligrapher. She took her task very seriously, as did everyone who was involved in our planning, and practiced several variations of writing each name before arriving at the most beautiful combination of florishes. I was thrilled beyond words when the final cards arrived.

The escort cards were multi-purpose: the table name was written on the back and the color of the washi tape indicated which meal they requested. When we could, we matched up the corks with wine moments shared with each guest. (You didn't think we drank all that wine ourselves, did you?!) Many guests noticed and remarked on the level of thought that went into such a small detail.
Our guests loved their escort cards too! They were a popular photographic subject for our shutterbug friends.


A postcard with an engagement picture directed guests to the website to view and order photos.
(above two images: guest photos)
The multi-generational family photos on the hunt table were an especial point of interest. For guests on either side of our family, it was a glimpse into the other side's past. Little tent cards explained who it was or the significance of the object.


A grouping of details for my paternal grandparents: their wedding photo, Mémère's favorite flower (pansies), and a lucky elephant they gave to my parents as a wedding gift. (Mémère collected elephant figurines and those with their trunks in the air are considered good luck.)

Under the bunting: a favorite engagement photo and guest book sign (letting guests know it was okay to write in the book) with washi tape accents matching the bunting flags.

More family details: my great-grandmother's peony and Mr. PaC's grandmother's calla lily. All part of my BBC plan.
(above four images: guest photos)
In the last few months before the wedding, another DIY project was added: our guestbook. This project is a complete surprise for you ladies since all of my time went into creating it and not blogging about it. Bad blogger, right? For this project, I gathered up our courtship ephemera and artfully arranged them into themed spreads of fun trips and favorite places. My intent was to create a scrapbook that doubled as a guestbook so I left open spaces for advice and well wishes. Here is a sampling of the 20+ spreads.

Stratton, Vermont. My first trip to the ski house.


Mexico: We vacationed at Penguin's honeymoon resort just a few months before she arrived.


Our unforgettable California wine trip

A beautiful state park where we almost had our engagement shoot.

Italian Festival

Another great trip - Outer Banks

Summer sailing and a fall wine trip to Finger Lakes (mere weeks before our engagement)
I seriously love every page, it's our story after all, but some pages will remain a mystery because they are just too personal to share online (like our love letter/card end papers) or stories you already know, like our engagement. The guestbook's sentimental value grew even more after our guests committed their best words and signatures in permanent (marker) memory. No one drew mustaches on us or wrote near a photo, although I created big photo spreads like the park one for that purpose.
Even though the hunt table was super long, it wasn't long enough to hold all of the above details plus cards and gifts. So our beverage bucket, emblazoned with our new last name, was stationed nearby to hold the multitude of cards. (Hive, did you receive mostly cards at your wedding? Aside from a handful of gifts, it was all cards. All the gifts happened at the shower. My guess is the card/gift ratio varies by region or type of wedding.)

The beverage bucket from my shower repurposed as a gift and card holder.
(guest photo)
Skipping ahead to the few ceremony details...


Paddle fans and our knotted nautical line ring holder
The designer in me would have loved to create ceremony programs to round out the paper suite, but it was something easily eliminated since our ceremony was uncomplicated and short. Marrying in a garden during the summer also means you don't have to spend money on ceremony flowers and decor. See? We kept it really simple.
But we didn't eliminate flowers entirely! There were bouquets, boutonnieres, and other beauties.

That sucker was heavy!
My bouquet flowers were craspedia, yellow protea, peach dahlia, light yellow ranunculus, yellow oncidium orchids, peach hypericum berries, seeded eucalyptus, and succulents. We kept the stems natural/bare and tied the bouquet with raffia. The bouquet dried really well and sat atop a bookshelf in our home until I dismantled it to create the recap banner at the bottom of each post.

Lush, wild and whimsical.

Pretty posies.
The bridesmaid bouquets had many of the same flowers as my bouquet but pared down. In my sister's bouquet above we have the fun yellow protea, craspedia, succulents, yellow ranunculus, peach hypericum berries, sprigs of seeded eucalyptus, and just a little bit of green trachelium.

The boutonnieres were simple: craspedia (two for the groom), succulents, seeded eucalyptus, and loops of bear grass bound with raffia. Our florist smartly pointed out that his bout had to withstand a whole day of hugs and dancing so she suggested using the sturdier flowers from our line-up.

The female equivalent of boutonnieres were the wrist corsages. We added peach hypericum berries and a raffia bow to make it more feminine. We were given a choice between pin-on or wrist corsages and opted for placement on the wrist so they would not interfere with the design of their gowns and withstand the aforementioned hugs.
Following the ceremony, our guests were free to wander the grounds and find their table. We had the privilege of seeing the terrace set up while it was still perfect and uncluttered with real life things, like guests, food, and drinks (which have a beauty all their own).


How lucky were we that the tent, tables, chairs, and linens were included at no additional charge?! We could have upgraded the linens and chairs to Chiavari (at $7.50/chair), but felt our money and energy were better spent focused on things that would directly impact our guests' and our experience. The white looks clean and crisp... and white matches white.
We spruced up the tented terrace with groupings of paper lanterns, whimsical centerpieces, and table names. (I do want to add that lighting the lanterns was completely unnecessary in the end. The ambient light was just too strong, even with 2-3 LEDs per lantern as Mrs. Trail Mix suggested. It would have had the desired soft glow effect had the lanterns hung from the trees in the garden.)

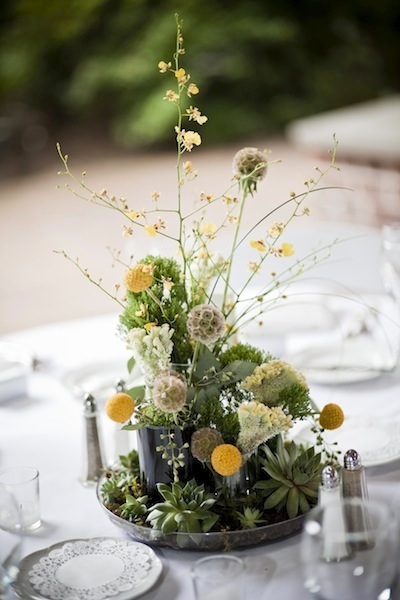
Each centerpiece was composed of three wine bottle vases, in different colors and heights, which held a mix of craspedia, green and yellow celosia, scabiosa pods, seeded eucalyptus, yellow oncidium orchids, and green trachelium. The trays were lined with moss and anchored with hen and chicks succulents.

No two centerpieces were the same because we varied the height, shape, and color of the wine bottles. The lack of uniformity created a whimsical and slightly wild look that allowed our florist to stretch her creative wings and have a little fun with it.

The craspedia and scabiosa pods make excellent dried flowers and our bookshelf has a few wine bottle vases filled with them. The succulents live on in containers in our back yard and are lovely reminder of our wedding flowers.
The toughest part of the table name project was choosing which drinks to include. (And who to seat at those tables because everything we did had a meaning behind it, e.g. sailors sat at the Salty Dog and Dark & Stormy tables, my grandfather's favorite drink was the Gin & Tonic, our Dewey Beach-loving friends rocked the Orange Crush table, and some of Mr. PaC's family sat at the two tables, Woo Woo and White Russian, named after drinks that they popularized.)

The final table names with locations were sketched out to aid our wedding elves.
We didn't reinvent the wheel with the design... like I wanted to by drawing each drink. Mr. PaC and I knocked this project out in a few hours from sourcing the images, finding the best recipe (his job), printing (which always takes the most time) and assembly. Those ubiquitous IKEA frames did the job!


Drink recipes were on the reverse for the curious and thirsty.

Mr. PaC hid interesting tidbits in each recipe, like an inside joke
about "sucio" or the proper way to drink a Woo Woo.

(above three images: guest photos)
One of the smallest details was also the tastiest: our Neuchatel chocolate favors. We had the option to customize the box size, color, finish, typeface, and typeface color. So many decisions for one little box! And I haven't even gotten to what was inside!

(guest photo)
We customized the flavors by swapping the milk chocolate champagne out for our favorite, hazelnut (gianduja), and kept the dark chocolate champagne to mark the occasion.

(personal photo)
And last, but not least, was our sweetheart table.


(guest photo)
We asked the venue coordinator if she could find some way to tie our chairs together using the line from our ceremony with our metal ampersand in the middle. She tried many variations of stringing the line through the ampersand before coming up with the above option that looked the best. Because of how we were seated, this detail didn't show up in most of the photos.

The tablecloth provided by the venue mimicked the floral swirls on my gown - totally unintentional. For the metal letters and ampersand, we shopped in our own house! You may remember them from the bridal shower post.
The last project worth noting is our DIY photo booth. I'll be recapping it later with tons of pictures so for now it's a preview of our photo booth set-up with some technical information. For a quick tutorial, our test run outlines the steps, specific products, and camera settings.

(guest photo)
The ingredients:
- Two tripods: one for the camera, a telescope tripod repurposed for the flat screen monitor and mount (borrowed from Mr. PaC's dad).
- A photo booth frame and backdrop held tight with adhesive velcro tape.
- A place to sit, piano bench borrowed from the venue.
- My camera with the focus locked in a set depth, a cable running from the camera to the monitor, and a wireless remote.
- For guests who needed it, directions were affixed to the front tripod for easy reference.

(guest photo)
- My giant "X" and "O" balloons.
- A basket of props - those you'll have to wait to see!
(all photos by Heather Fowler Photography, unless otherwise noted)

Catch up on our PaC recaps!
Days Before
- In the days leading up to the wedding, I wanted to be sedated.
- I walked the line between calm and stressed for the better part of our rehearsal day.
- "Don't panic" and its friends were what Mr. PaC kept telling me on the way to our rehearsal dinner.
Wedding Morning
- Best wedding morning advice: wake up slow and tackle the day at your own pace.
- Once at our venue, our DIY projects were assembled with our own two hands.
- The girls get ready with champagne and chocolate-covered potato chips.
- The guys are ready... and waiting.
- She's mine! All mine! (The dress that is.)
- Brown-eyed girl (and guy) portraits.
- Something old and new, borrowed and blue.
Portraits
- My sneaky groom has a secret heart when it comes to surprises.
- A first look for the two of us plus more couples portraits in the garden.
- With brother and sister standing by, we took our bridal party and family portraits.
Ceremony
- After fretting about rain, the sun came out just as our guests arrived for the ceremony.
- Maybe I was just a little amazed at how beautifully our ceremony had started.
- After waiting 19 long months, here comes Mr. PaC's girl!
- We spoke of love and some verses in our ceremony.
Reception
- Cocktail hour began with a rockin' start.
- That silly "Mahna Mahna" song we used to introduce our important people.
- Our first dance shows that we are truly better together.
- The parent dances allow us to appreciate the important people in our lives.
- Jammin' the first half of the night away.
- Our siblings made sure we were toasted and roasted!
No comments:
Post a Comment